Finally. At last. It seemed like it would never happen. Finally.
It has started to get warmer out, and the next couple of weeks look perfect for maple sapping. A lot of people have asked me how one goes about tapping a maple tree, so I decided to write a blog post about it. Here are the steps:
1) Unless you know what the bark of a maple tree looks like, figure out which trees you are going to tap in the summer and mark them. Go by the leaves. If it looks like a maple leaf, it’s a maple tree. There aren’t any maple-leaf look-a-likes in our area. You can put one tap into a tree that is at least 12 inches wide, two taps into a tree that is at least 20 inches wide, and three taps into a tree that is at least 28 inches wide.
2) Get all of your supplies ready to go. You need taps, some form of coverable bucket or jug to attach to the taps for the sap to drip into, food grade containers to store the sap, a 7/16 drill bit, a drill, a hammer, some type of cheese cloth to strain the sap through, a fuel source for boiling the sap outside, containers for boiling the sap in, food grade containers to put the finished product into, and vigilance in your soul to collect sap every day and then boil big batches of it down into the sweet stuff.
3) Watch the weather. Starting in mid-February I start checking the 10-day forecast often to see when the temperature will climb above freezing. Ideally, you want the daytime temperature to get into the 40’s and the nighttime temperature to drop down into the 20’s. As soon as that starts to happen in the forecast for more than an isolated day or two, it is time to tap. This year was on the later side, but it has come, and it looks beautiful.
4) Once the big day has come, grab your drill, taps, hammer, and buckets for catching the dripping sap. Make your way to the trees.
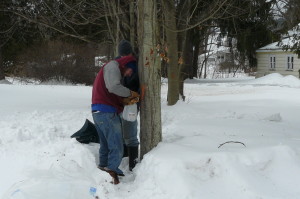 5) Look over the tree. Drill a 1.5 to 2 inch deep hole with your bit on the south side (which faces the sun) of the tree about three feet above the ground (not the snow). Avoid any bad spots in the tree. Try to put your tap in a spot where there is a large branch directly above it. If it is a good day for it, the hole you made might start leaking sap out of it before you can even put the spile in.
6) Gently use your hammer to tap the spile in until it won’t go in any further without hitting it really hard and you can’t wiggle it at all. Depending on the day, sap may start coming out immediately.
7) Hook your bucket or jug to the spile (it has a hook on it) so that it catches the sap. Make sure it is covered so that snow and other debris don’t get into your sap.
That is all it takes to tap a tree. It only takes a minute or two, but I get excited like a little kid when I see sap running out. There is much work following the tapping, but this blog post is about tapping.